Audience: Install Developers, Beginner, Windows Installer (MSI) Knowledge
This is Part 1 of a three part series that demonstrates how to use C++ in a Windows Installer Custom Action.
- Introduction
- Part 1 - Creating a Windows Installer .dll
- Part 2 - Calling the Windows Installer .dll from a setup
- Part 3 - Debugging a Windows Installer .dll
Creating a dll to be called in a custom action is easy. I use Visual Studio 2005 (why? – because that's what the company I work at uses, and I like it). Obviously, there are other compilers out there that will get you the same results but, for our purpose we will demonstrate the VC++ way. You’ll be up and running in minutes.
1 - Start a new project.
- Project Type: MFC DLL
- DLL Type: Regular DLL with MFC statically linked
- Name: CustomActions
I find this the quickest and easiest method, the wizard creates everything you need. You could choose other types (like Win32 project) however, MFC DLL is my preference.
I always recommend static linking for Windows Installer Dlls – Typically the Dll will be streamed from the .msi to the %temp% folder, and called from there. Statically linking helps ensure everything you need is contained in one dll.
I always recommend static linking for Windows Installer Dlls – Typically the Dll will be streamed from the .msi to the %temp% folder, and called from there. Statically linking helps ensure everything you need is contained in one dll.
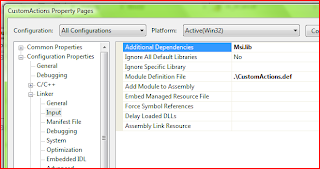
2 - Update Project Settigns, and Link to Msi.lib
Open the project properties for CustomActions, and link to Msi.lib
Open stdafx.h, add the following includes.
#include <MsiQuery.h>       //Windows Installer API

#include <Msi.h>
3 - Write your Custom Action(s), Export the Function
Open CustomActions.cpp, and add your code. Each Custom Action requires the following prototype.
/*     MyFunction     **************************************


Args: [in] MSIHANDLE hMsi

       - handle to running install (passed by the Windows Installer)


Desc:     Example

************************************************************/

UINT __stdcall MyFunction(MSIHANDLE hMsi)

{


     return ERROR_SUCCESS;

}
Open CustomActions.def and export the function name.
; CustomActions.def : Declares the module parameters for the DLL.


LIBRARY     "CustomActions"


EXPORTS

     ; Explicit exports can go here

       MyFunction
4 - Build the dll
That’s it the dll is ready to go...
The next step is adding the .dll to your setup project, which is covered in Part 2.
The next step is adding the .dll to your setup project, which is covered in Part 2.
No comments:
Post a Comment